For any SEO who collects email leads from web forms, the dreaded part of their existence tends to be the end of the month, when it comes to reporting conversion results to clients—verifying, re-verifying, downloading, and exporting them to generate the all-important month-end reports. It can take hours and can be very tedious, but the information gleaned from this process is well worth it. There are, however, ways to optimize your workflow to the point that it almost feels like cheating your way through the process.
By using standalone programs or macros (mini scripts within a program), a project that would normally take hours turns into minutes, and I want to take this opportunity to teach you how to do this on your own. I will use a standalone program and a macro that I found through my research to demonstrate the process so you can get a better idea of what is involved.
How to scrape leads from your Gmail (or almost any other email client)
There are a wide variety of ways to scrape leads from Gmail. You can spend the money to get a program like UBotthat will help you automate the task without much effort. You can get a program like iMacros, and spend the time learning how to build proper macros that will scrape from your email box. You can spend the time to learn how to program scripts using Grease Monkey, or you can program your own stand-alone scripts. Whatever you do, you will want a solution that is as quick and easy as possible and helps to automate the task without adding much effort. I found a program on Black Hat World that is made to work on Windows, so you Mac users will need to install Windows to use it. You can download the program here.
While I am aware of the hesitation involved in downloading anything from black-hat websites, my own tests of this tool have worked out well. There are comments and reviews about this tool around the web, and it seems to work well for many users. My own research has not found an instance of this tool doing anything nefarious behind the scenes, and I would not hesitate to use it in my own email scraping.
How it works
This program works by accessing the Gmail account that is added to it and exporting the To:, From:, Body:, and Date: fields from each email. Here is how to use it:
- Select the email settings you wish to use to download your emails. You can select To:, From:, Subject, and Date. The "Body" export is disabled; according to the tool's creator it would end up scraping all of the HTML.

- Enter your username. This is your full email address (username@domainname.com).
- Enter your password.
- Enter the server and port number you wish to use. By default, it's set to pop.gmail.com and port # 995.
- Select whether or not you wish to use a secure connection. This will allow the program to access Gmail whether or not a secure connection is available. If your email does not actually require a secure connection, be sure to uncheck the box.
- Once these settings are selected, it will save a file in the email extractor folder with a name that looks like this: 10-1-2013-1-00 AM_Username@gmail.com.
Be sure you don't violate your host's terms of service
This program can also work for other email hosts. Try it! Be sure to put in your applicable login details, and you should be able to scrape your emails without any trouble. However, be sure that you are actually allowed to scrape email from your host. Not all hosts will allow you to do so. Before using egregious scraping on your email account, just double check your terms of service (ToS) so that you don't accidentally get yourself banned from your email service. Why would an email service not allow scraping? Well, it can cause bandwidth issues if you have hundreds upon hundreds of thousands of emails to export. If this becomes an issue, you may raise an eyebrow or two at your email provider. So, be sure that you really want to do this if you want to place such a large load of use on the email services. The author of this article is not responsible for things that may happen if you do not follow specific terms of service regulations. For your reference, here are the terms of service from several common providers:
Gmail ToS: Gmail does not have any terms that specifically prohibit scraping emails. While Gmail does state you may not access it using a method other than the interface, this is a very gray area that does not provide examples. If someone is collecting lead information for a valid reason like monthly reporting for their own use, there shouldn't be an issue. If, however, someone is using access via another method in order to take down the Gmail service, then I would imagine this is where the Terms of Service here comes into play. And this is why I mentioned the large bandwidth usage that downloading thousands of emails can cause to a server, for example. Be sure you really want to proceed before doing so and make sure you won't be somehow banned from your email service as a result. We are not responsible for egregious misuse of a service with intentions to cause interference of the service through significant bandwidth use.
MSN ToS: Does not have any terms that ban exporting emails using any of these methods to export emails. (Be sure to read your own ToS).
Yahoo! ToS: Does not seem to have any terms that prohibit exporting emails. (Be sure to read your own TOS).
Hostgator email limits: While ToS doesn't specifically seem to limit scraping or exporting of emails, there are policies and limits in place. According to Hostgator's mail policy and limits page, "Each connecting IP is limited to 30 POP checks per hour." Possible interference issues with Hostgator services and this software can occur if you are using the software 100s of times per hour, for example. However, because it uses at least one pop check in order to download your emails, you shouldn't have too many issues unless you continue multiple downloads of emails from your account per hour. In which case, you will "likely get a password error indicating that the login is incorrect." Such an issue corrects itself within an hour and the email checking will automatically unlock.
Also according to their mail policy and limits page, their VPS plan and Dedicated do not have the same restrictions as their shared accounts do, so you will probably have more success with high-volume scraping on your own private servers.
A fair warning, however: I haven't specifically tested this with Hostgator, so be sure to use caution when exporting too many times.
Importing your scraped file into Excel
Once you have scraped your email and it saves it as a text file, it shows up all garbled. What we want to do now is import it into Excel so it displays all of the tab-delimited items as columns, so that we don't have to manually copy and paste every single one. To do this, let's open up our file in Excel by clicking on File > Import.
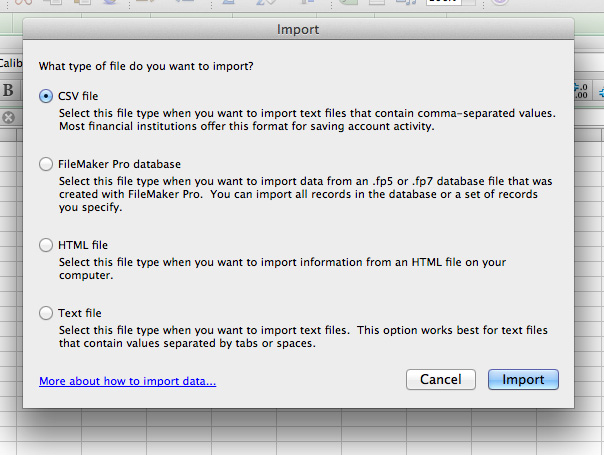
It will ask you: What type of file do you want to import? By default it has selected the CSV format but let's select the text file format since our program saved this to a text file.
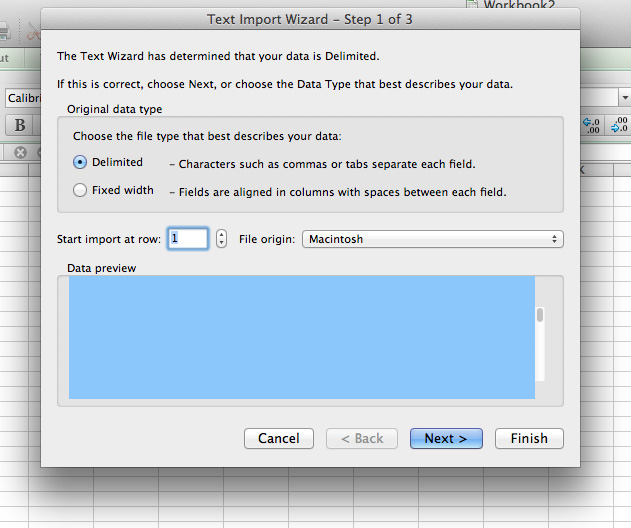
Now, click the file that you want to open and click on "Get Data." The text import wizard will pop up showing you settings to choose from. Select the "Delimited" option unless it is already checked by default. Then click on Next.
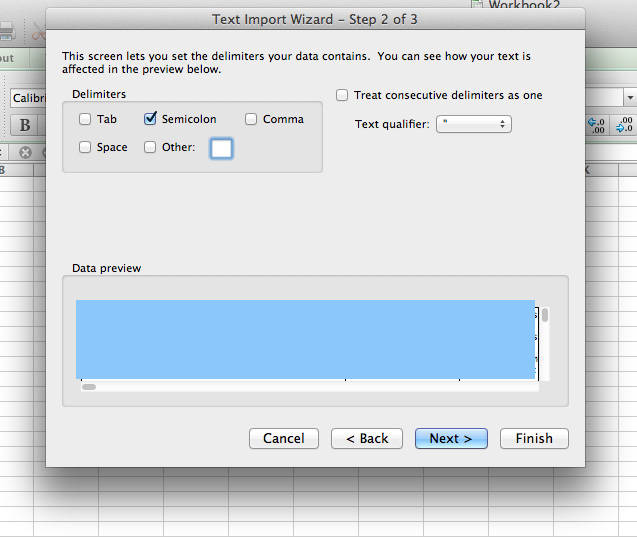
In this step you can set the delimiters that your data contains. Remember when we selected the semicolon back while importing our file? Select the semicolon option here. Then, let's click on next.
Here, we can set up our columns and set the data format. For our purposes, however, let's just go with the default options.
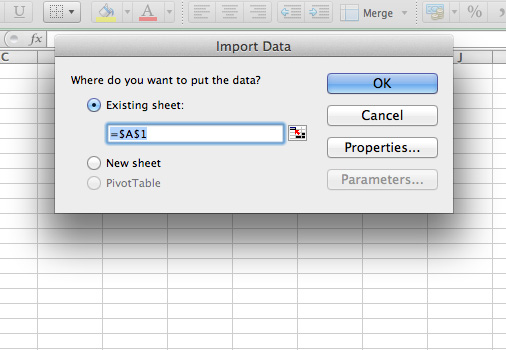
Now, it will ask you where you want to put the data. You have a choice of Existing Sheet (which starts at =$A$1), new sheet, and pivot table. For the purposes of this article, let's just go with the default and click on OK.
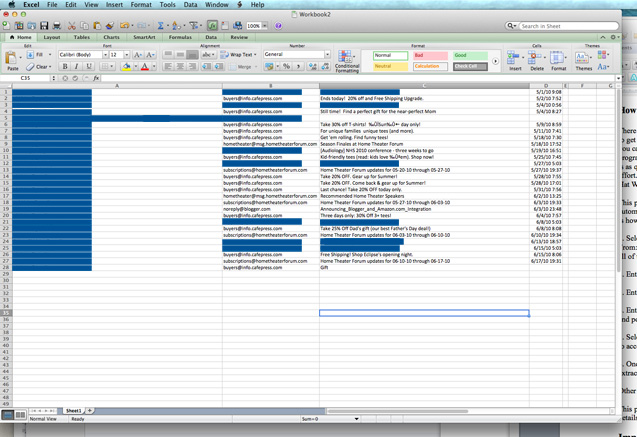
Here, you see we have perfectly aligned columns and data without much work. Now you can move forward with formatting these columns and data in whatever orientations or pivot tables you like.
How to download leads from Outlook to Excel
For those who use Outlook, depending on your version, it can be cumbersome to get the data out of the program and can take longer than in just about every other program. Thankfully, Outlook features macros which can be used to export all of your data in the span of just a few seconds!
Step 1: Find or create the macro script you want to use
There are a ton of options and configurations available for this task. For our purposes, we will use modified versions of the scripts located here.
Before we get started, we will need to get the basic code from the very first code snippet, shown below. This code only exports the Subject, Received Time, and Sender of the email message. Our goal is to modify this script so that our new code will extract the entire body of the message and output it to the spreadsheet as well. Don't worry! I am going over each line of code that we modify in this tutorial! This way, you will understand exactly what we are doing and why.
Sub ExportMessagesToExcel()
  Dim olkMsg As Object, _
     excApp As Object, _
     excWkb As Object, _
     excWks As Object, _
     intRow As Integer, _
     intVersion As Integer, _
     strFilename As String
  strFilename = InputBox("Enter a filename (including path) to save the exported messages to.", "Export Messages to Excel")
  If strFilename <> "" Then
     intVersion = GetOutlookVersion()
     Set excApp = CreateObject("Excel.Application")
     Set excWkb = excApp.Workbooks.Add()<br>  Set excWks = excWkb.ActiveSheet
     'Write Excel Column Headers
     With excWks
        .Cells(1, 1) = "Subject"
        .Cells(1, 2) = "Received"
        .Cells(1, 3) = "Sender"
  End With
  intRow = 2
  'Write messages to spreadsheet
  For Each olkMsg In Application.ActiveExplorer.CurrentFolder.Items
     'Only export messages, not receipts or appointment requests, etc.
     If olkMsg.Class = olMail Then
        'Add a row for each field in the message you want to export
        excWks.Cells(intRow, 1) = olkMsg.Subject
        excWks.Cells(intRow, 2) = olkMsg.ReceivedTime
        excWks.Cells(intRow, 3) = GetSMTPAddress(olkMsg, intVersion)
        intRow = intRow + 1
     End If
  Next
     Set olkMsg = Nothing
     excWkb.SaveAs strFilename
     excWkb.Close
  End If
  Set excWks = Nothing
  Set excWkb = Nothing
  Set excApp = Nothing
  MsgBox "Process complete.  A total of " & intRow - 2 & " messages were exported.", vbInformation + vbOKOnly, "Export messages to Excel"
End Sub
Private Function GetSMTPAddress(Item As Outlook.MailItem, intOutlookVersion As Integer) As String
  Dim olkSnd As Outlook.AddressEntry, olkEnt As Object
  On Error Resume Next
  Select Case intOutlookVersion
     Case Is < 14
        If Item.SenderEmailType = "EX" Then
           GetSMTPAddress = SMTP2007(Item)
        Else
           GetSMTPAddress = Item.SenderEmailAddress
        End If
     Case Else
        Set olkSnd = Item.Sender
        If olkSnd.AddressEntryUserType = olExchangeUserAddressEntry Then
           Set olkEnt = olkSnd.GetExchangeUser
           GetSMTPAddress = olkEnt.PrimarySmtpAddress
        Else
           GetSMTPAddress = Item.SenderEmailAddress
        End If
  End Select
  On Error GoTo 0
  Set olkPrp = Nothing
  Set olkSnd = Nothing
  Set olkEnt = Nothing
End Function
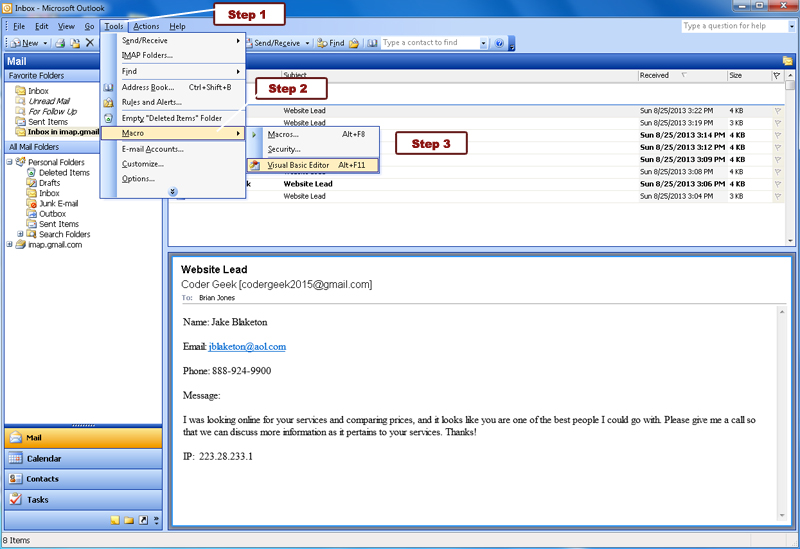
In order to get started, fire up your version of Outlook. I'm using a relatively old dinosaur version (Outlook 2003), but the steps can easily be found online for all versions. Most Windows versions should allow you to use Alt+11 to open the Visual Basic code editor, which we are going to fire up next. To do this, follow these steps:
Step 1: Click on Tools.
Step 2: Click on Macro.
Step 3: Click on Visual Basic Editor.
Step 2: Click on Macro.
Step 3: Click on Visual Basic Editor.
Next, we are going to copy and paste our code here into the editor window. Now, I used the revision 1 script and modified the original version to extract text from the body by coding the following lines. One after line 19, and one after line 29:
.Cells(1, 4) = "Message" <-- This line tells the macro program to add another column to the first row that is labeled "Message". This will add a new column that displays the text extracted from the email. This one was added after line 19.
.excWks.Cells(intRow, 4) = olkMsg.Body <-- This line tells the macro program to extract the message text from the Body of the email. This way, we have an extremely easy and fast method of verifying all of our important conversion emails that we are going to be using in our reporting.
Now that we have our script ready, let's go to the Visual Basic macro editor.
In the project window underneath the project, right-click within the window, click on insert, and then click on module. This will bring up a VbaProject.OTM file that you can add your code into, as shown in the following screenshot:

Once you have made your desired modifications (or if you desire to use the original script and copied and pasted it, just click on the floppy disk in the upper left hand corner and save the file. Or you can use Ctrl+S to save it. Then, close the Visual Basic editor.
Next, we're going to run our newly modified macro! First, make sure the folder that you want is selected and all the leads you want to export to an excel spreadsheet are in that folder. Then, let's click on Tools > Macro > Macros.
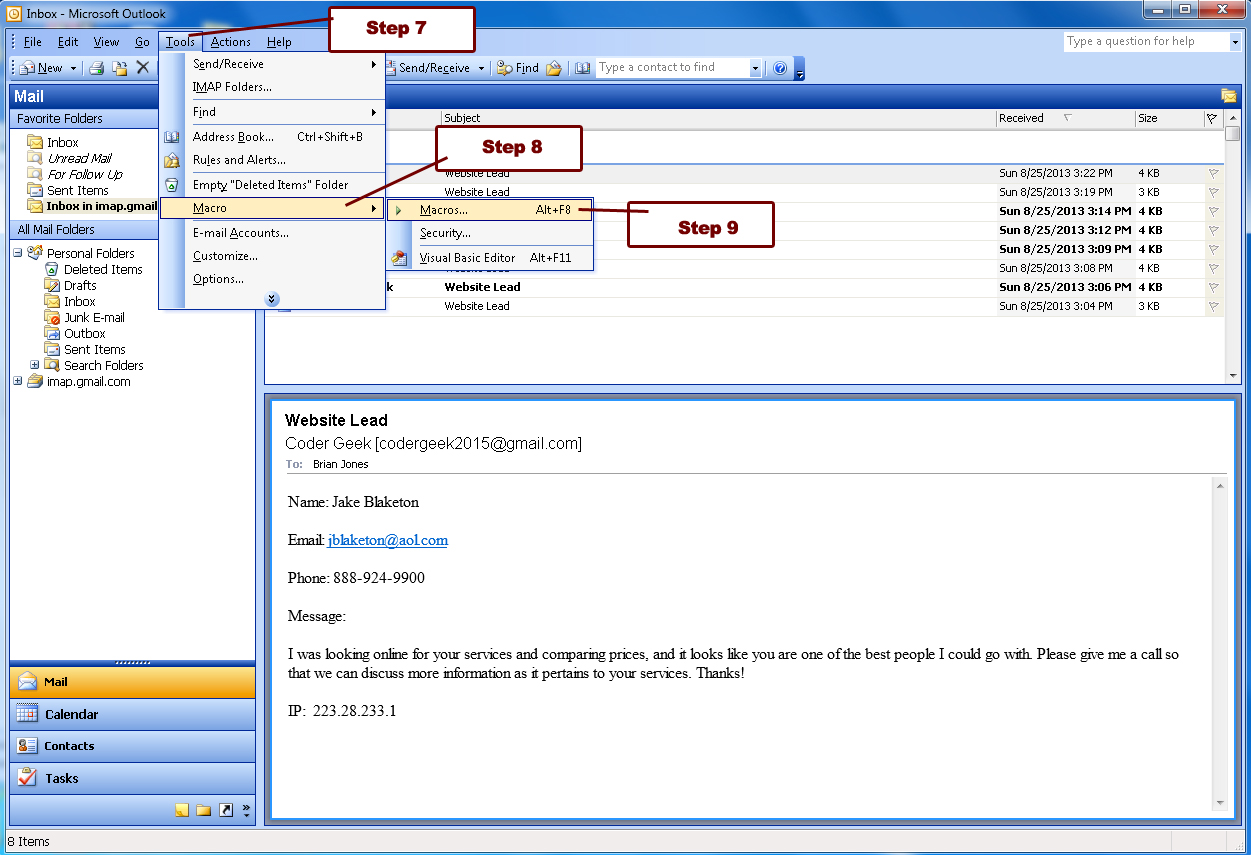
Next, you will see a Macros window pop up. We need to click on the macro we want to run, and then click on run.

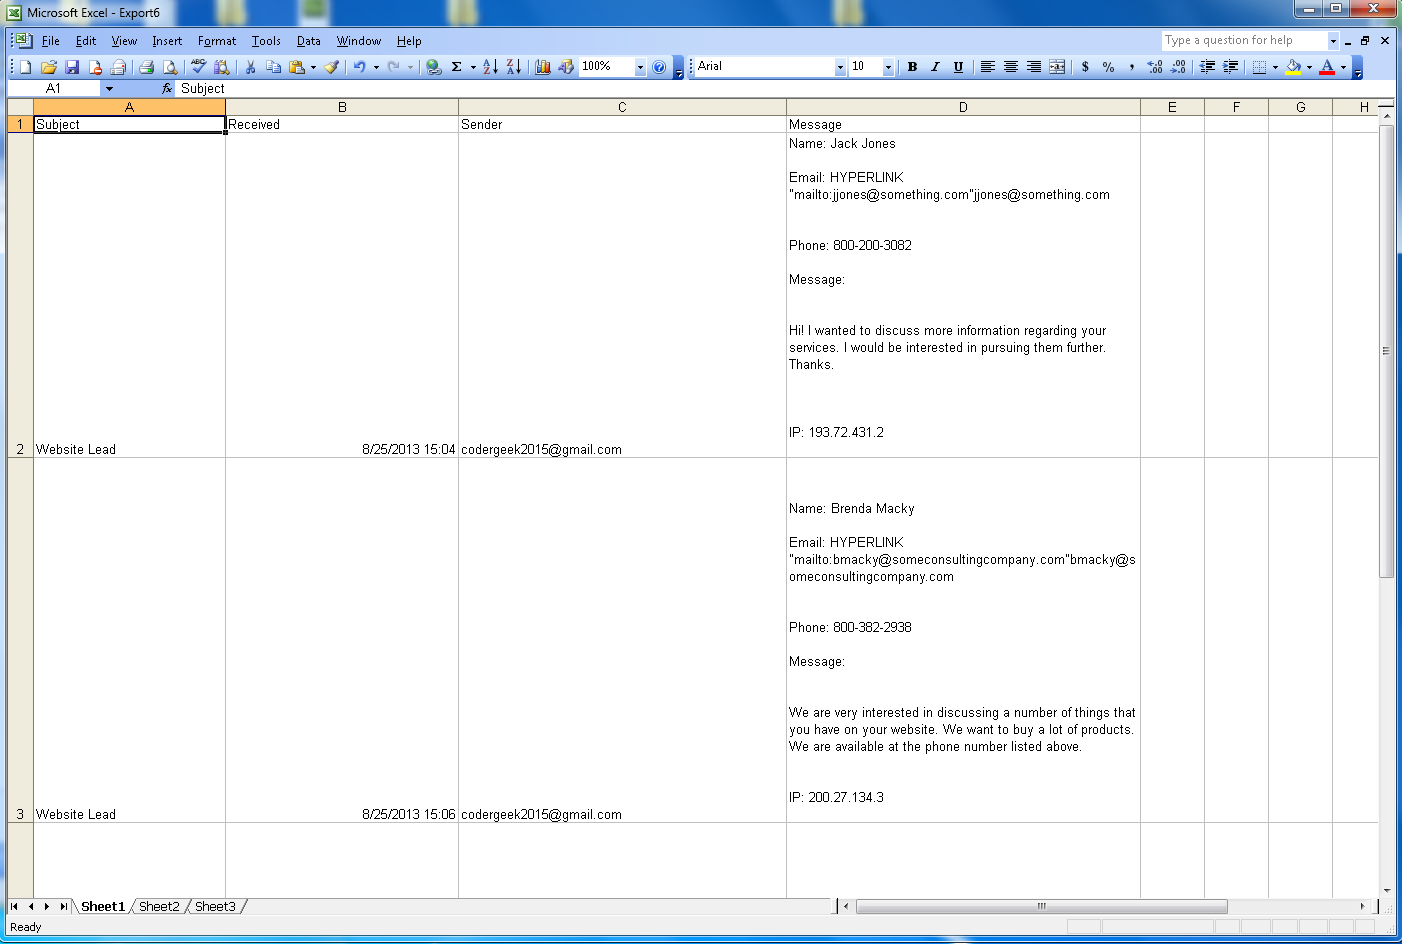
True to the nature of the script, you will be prompted with a dialog box that asks you what you want to name your file. Let's call it "ExcelExportTest". It will save it into your My Documents folder. Fire up Excel, and open your brand new spreadsheet. Here is the final version of our example, complete with all extracted elements of that folder:
Wrap-up
By using these methods, it is possible to greatly reduce the time that you spend on manually verifying and copying/pasting leads from your email box. It will be completely automated! Once you get the hang of using these methods, most of your time will be spent in the formatting phase that comes next. So, it will be necessary to spend this time adding some proper formatting that will help make your reports beautiful and impactful.
No comments:
Post a Comment